So Bobbi Brown ‘has called BS on contouring’ saying, “I don’t get this whole contouring thing…[it] makes you look like you have dirt on your face.” She sees it as something more ‘extreme’ than the usual enhancements woman make to their physical appearance via make-up products and techniques. Now, I’m no contour fanatic but I honestly can’t see what all the fuss is about. I find lash extensions an altogether more involved and unpleasant proposition than adding a little extra light and shade to your face that you can easily wash off again in the evening.
If you’re not beauty-blog obsessed like me, then it’s possible the whole contouring phenomenon has passed you by. In short, it’s the technique of using creams or powders in shades lighter and darker than your natural skintone on different parts of your face to achieve a slightly altered appearance to your face shape e.g. more defined cheekbones and jawline and a slimmer nose. It has been popularised by the Kardashians and their make-up artist Mario Dedivanovic. If you’ve seen the pictures of Kim Kardashian before she’s blended in all of those shades, then you’ll know it looks kind of crazy. If you’ve seen any pictures of her once it’s all done, then you’ll know her finished face doesn’t.
I’m not advocating following the Kardashian Kontouring example every day, or any day actually. I don’t have the time, money or inclination to try and radically redefine my face shape. Remember that being photographed is their full-time occupation – plus they have make-up artists to do it for them! However, a little light contouring is not taking us down a totally different and more dangerous path than other make-up techniques that all come off at the end of the day with a hot flannel. It’s just another fun thing to try if you want to and – as with all of these things – as long as you’re not in the territory where you can’t leave the house without doing it or you’re going without food or other essentials to afford to buy the products, then I don’t see the harm. I personally enjoy some light contouring most days and occasionally ramp it up for a special occasion or night out (actually, a night out is a special occasion to me these days…)
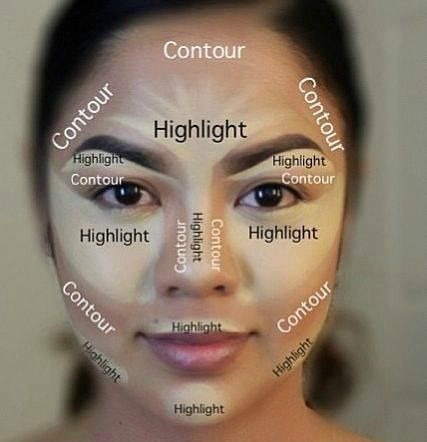
So, for those of you who want to experiment with contouring, I thought I’d outline the techniques I use. I would call this ‘contouring for normal people’ (I just use the products I already had in my stash). However, if you want to go the whole hog, there is plenty of scope elsewhere on the internet. The picture below shows you where you should be putting all your highlight and contour shades for that job.
Before you start with the contour apply your base – primer, foundation, CC cream, concealer – whatever you usually do there. Then, depending on your time/effort threshold, follow one of these two techniques.
For a quick, everyday contour
1. Choose a bronzer (or special contour product) without any shimmer in it and apply it to the face in a ‘3’ shape – under the cheekbones, up onto the temples, along the hairline and down under the jaw.
2. Choose a highlighter and apply it to the face in a ‘C’ shape, working from the top of your cheekbone up along the brow bone just above your brows. Done. This all takes about two minutes and involves the purchase of few (if any) new products.
I think adding some blush is required, but then lips and eyes is all up to you.
Contouring for special occasions – or just if you feel like it
![]()
1. Apply a light-reflecting concealer (or one that’s slightly lighter than your skintone) in a triangle shape under your eyes – draw along the crease of your dark circles, then down until level with the bottom of the nose, then join up the two lines. Blend, blend, blend!
2. Apply a non-shimmer bronzer (or specialist contour shade) in the hollows of your cheeks (make a duck face if you have to), working from your hairline into the centre of your face. Imagine a line coming down from the centre of your eye and don’t bring the brush in any further than that. Blend upwards.
3. Take the same bronzer or contour shade and apply it to your temples and up along your hairline. Blend away.
4. Now take the bronzer under your jawline and blend into your neck. You can also add bronzer down the sides of your nose, but I usually don’t bother.
5. Apply a highlighter in a ‘C’ shape as above, but also brush some in a line down the centre of your nose and on your Cupid’s bow.
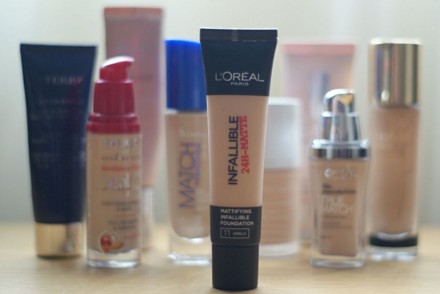
A note about the products I use for contouring: bronzer (though I take only the darker shade onto the brush for the second method); highlighter; and I change up the concealer (just because I have loads) but usually use this one, this one and this one. I use this brush for the contour shade and my fingers for the highlighter as it’s a cream formula.
What do you think? Is contouring a step too far? Does it represent a fundamental shift in how we’re using make-up, or is it just another fun technique to try out when we feel like it?
4 Comments
Going to try this as I’m awful at highlighting and contouring 🙂 thanks for sharing #thelist
xx
Hope you find it useful! I know I had no idea about this until I recently but really like what a little light contouring does to the face – thanks for reading and taking the time to leave a comment xo
Aww you beautiful lady!! Great post – I’d never even heard of contouring until this year and only really dabble in a bit along that line just below my cheek bone. As for highlight, I have quite a few and not a clue what to do with them. All in all, this has changed my life. Haha!
Thanks for linking up to #TheList xx
Haha! Thanks! I was hesitant to write this in case everyone already knew all this stuff – so glad you found it useful. I haven’t got it but if you want to get a really nice highlighter then the Mary-Lou Manizer by The Balm is mean to be the best xo